
FerdieQO
Well-known member
- Joined
- Jul 15, 2016
- Messages
- 230
- Points
- 28
If you want to create a server to sync/share files for your images, backups, calendars or any data, ownCloud is a good solution. It is open source software intended to be simple to host. In addition to being similar to services like Dropbox, Google Drive, ownCloud is free for everyone who wants to try it on a computer or server. In this tutorial, you will know how to install and configure ownCloud on Centos 7 VPS.
Before starting, you need to prepare:
CentOS does not have this software in its default software repositories, but ownCloud has its repo to handle. First, enter the release key:
Then run this command to download the repository:
Now, we will introduce this package by clearing the cache with yum:
The result will be similar:
Loaded plugins: fastestmirror
Cleaning repos: base ce_stable extras updates vz-base vz-updates
10 metadata files removed
First, install the owncloud package by running the command yum install:
You have successfully installed the ownCloud package, now is the time to create a database!
Step 2 - Create a database
Log in to MySQL by executing this command:
When asked, enter the root password you are using
Create a new database named owncloud:
Now create the user and assign it to owncloud database:
Change the password to the password you want to use with this user to access the database. Once completed, exit MySQL:
Database and user are ready; you can now configure your ownCloud.
Step 3 - Configuration
To access ownCloud via the browser with this URL:
https://your_domain_or_IP/owncloud
When you access ownCloud, a warning will appear saying that the certificate may be unreliable. You can ignore it; the data will still be encrypted. Alternatively, you can install the SSL certificate from Let’s Encrypt to clear this warning. The same screen may appear after the warning:
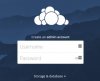
Enter the Username and Password to install the new administrator account. After that, access to Storage & database.

Leave the data folder as it is, and click on MySQL / MariaDB under Configure the database. Here you need to fill in the database name and user created in Step 2.
After that, proceed by clicking the Finish setup button .
It is done! You have entirely installed ownCloud; you can upload data to your cloud server. OwnCloud installation process is a simple process, you have installed a new repository for CentOS 7 VPS. Then you create the database and fill configuration information for initial installation. You can now use the features of this software without problems.
Before starting, you need to prepare:
- SSH root access to VPS
- LAMP stack
CentOS does not have this software in its default software repositories, but ownCloud has its repo to handle. First, enter the release key:
Code:
rpm --import https://download.owncloud.org/download/repositories/stable/CentOS_7/repodata/repomd.xml.key
Code:
curl -L https://download.owncloud.org/download/repositories/stable/CentOS_7/ce:stable.repo -o /etc/yum.repos.d/ownCloud.repo
Code:
yum clean expire-cacheLoaded plugins: fastestmirror
Cleaning repos: base ce_stable extras updates vz-base vz-updates
10 metadata files removed
First, install the owncloud package by running the command yum install:
Code:
yum install owncloud -yStep 2 - Create a database
Log in to MySQL by executing this command:
Code:
mysql -u root -pCreate a new database named owncloud:
Code:
CREATE DATABASE owncloud;
Code:
GRANT ALL ON owncloud.* to 'owncloud'@'localhost' IDENTIFIED BY 'password';
Code:
exitStep 3 - Configuration
To access ownCloud via the browser with this URL:
https://your_domain_or_IP/owncloud
When you access ownCloud, a warning will appear saying that the certificate may be unreliable. You can ignore it; the data will still be encrypted. Alternatively, you can install the SSL certificate from Let’s Encrypt to clear this warning. The same screen may appear after the warning:
Enter the Username and Password to install the new administrator account. After that, access to Storage & database.
Leave the data folder as it is, and click on MySQL / MariaDB under Configure the database. Here you need to fill in the database name and user created in Step 2.
After that, proceed by clicking the Finish setup button .
It is done! You have entirely installed ownCloud; you can upload data to your cloud server. OwnCloud installation process is a simple process, you have installed a new repository for CentOS 7 VPS. Then you create the database and fill configuration information for initial installation. You can now use the features of this software without problems.